Tuesday, November 24, 2009

How To Install Theme In Samsung Star 3G?

Hello All,
This post of mine is very brief.. I am currently very busy with my work, so hardly get time to maintain my blog. Anyways THE WHOLE CREDIT FOR THIS GOES TO DARKFOREST & HIS TEAM FOR THEIR DEDICATION & HARD WORK. The below content is straight extract from them mail sent by Darkforest to me.I'll be adding the proper steps later on (ie with the picture & all).
Before we start, like always TAKE BACKUP OF YOU PHONE. IF YOU SCREW UP IN THE PROCESS NEITHER I OR DARKFOREST WILL BE RESPONSIBLE FOR IT.!!!!!

Now thats all clear.. then just follow the below steps. (The below is the extract from the mail sent by Darforest)


This is the nv_original.ini file you will need, taken from XEII4 firmware download it.
4shared.com/file/146853253/f5f85cf1/nv_original.html

This file will need to replace the one located in the " Baltic " folder on your phone.

I have added the lines that needed to activate dark theme (black theme), so you just have to transfer the file .

steps for this method -->

connect your phone and start tk file explorer

open systemFS --> settings --> preconfiguration --> Baltic --> NV --> put this file there.

to put this file ... you can see two windows in tk file ..... just on the upper window go wherever you have this file and drag down in the NV folder of Baltic

After this close tkfile..... and disconnect phone.

Do preconfig on the phone

dial *#6984125*# --> Pre-connfiguration --> *#73561*# -- > select Baltic.

Your phone will restart and the new theme will be active.

*Note...
But if you change the theme to red or green, it will be gone, you will need to do the Pre-configuration again to see it.
So if you like it don't change it back to green or red


PS: If you liked my blog & it has helped you in anyway kindly click on some of the sponsor links :)
Also if you are leaving a comment I would request you to kindly leave it with your email address, so that I can reply to you on your mail id as I hardly get time to logon to the blog & reply.
Thanks.

Thursday, July 23, 2009

How To Update Firmware on SAMSUNG STAR 3G?

Hello Guys, this is my second attempt to make JAVA work on this phone. I was able to do this one also successfully with help from my friend Dark Forest!! :) Thanks Mate . (If you don't want to upgrade your firmware have a look at my previous post here)

OK so now the question is how to do the FIRMWARE UPGRADE & WHY TO DO IT??
Well for starters you can INSTALL JAVA on STAR as you would do on any Nokia or Sony Ericsson phone & second BUG FIXES. Now if you haven't encountered any bug on the phone I'll mention some. The message storage is suppose to be 500, but around only 200+ messages are stored in the phone & then it says inbox full. Also when you have an incoming call or outgoing you cannot see the number to which it is going (provided you have the number stored in your phonebook) When you have multiple numbers stored under single name this is a problem, this has been fixed as you get to see along with the name of the person calling you his/her number. 4 more Russian widgets have been added (If you know Russian good :D ). 3 new games :)

Now 2 things have changed (atleast for me) The "E" indicator which used to come up on the screen on the top to indicate if the GPRS session is active, is always there & second initially when I needed to use the gesture control on the phone I used to press the lock button slightly & the screen wouldnt get unlocked but just be in standby mode & i could write the character on the screen & it would work. This has changed, now in order to achive this I have to press the call pickup/call cut or the back button on the Star 3G & regarding the E indicator, Dark Forest has confirmed it, thats nothing to worry about. It just
means that GPRS Edge is available on your network, it will turn red if connected to the net. That is normal with all open market firmware. :) So problem solved. :D

Now to get on with the Firmware Upgrade (Flashing)

1st -> You have to check if you have SIM LOCK enabled on your phone.Type *#7465625# and see. SIM LOCK SHOULD BE OFF. Do not proceed if you have it ON, get it to a shop & have it disabled.

2nd -> BACKUP YOUR PHONE!!! Your contacts, messages, pictures, wallpapers, ringtones, music, gprs settings etc.. (I have provided with GPRS setting for Vodafone Mumbai below)

3rd -> You will require USB cable (The one which came with your phone) & PC Suite. Make sure PC suite is installed before you start the process as it has the drivers necessary for communicating with your phone.Make sure the phone is communicating with your PC using PC Suite.

4th -> You need to download the firmware from Dark Forest's Site as shown below.


Side by side also download Multiloader from
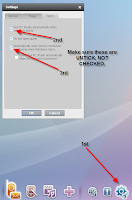
 here

5th -> Now unpack the FIRMWARE files in a folder also make sure no program in your system start-up is occupying the COM ports. PC Suite will also cause a problem, so to fix it do as shown below.


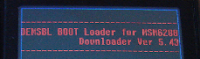
Now that you have done this, switch off your phone, remove the battery, sim & micro SD. Place the battery back inside & press the volume down button,camera button & the power button all together. the phone will power up & will have a screen as shown below. In the mean time also restart you PC (This is very IMPORTANT)


Now that you PC is restarted connect the phone to the PC using the USB cable.

Now before going on further with the actually FIRMWARE UPGRADE(FLASHING) a disclaimer.

I HAVE NOT CREATED THIS METHOD NOR DO I TAKE CREDIT FOR IT. DARK FOREST & HIS TEAM ARE THE REAL INVENTORS , I AM JUST WRITING A METHOD SPECIFICALLY MENT FOR SAMSUNG STAR 3G WITH PERMISSION FROM DARK FOREST. IF IN THIS PROCESS YOU END UP SCREWING YOUR PHONE WE ARE NOT RESPONSIBLE. ALSO BY DOING THIS YOU ARE VOIDING YOUR WARRANTY FROM SAMSUNG.


Now thats clear, lets begin.

1st -> Open up MULTILOADER & select the options in the exact order as shown below.

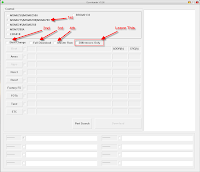
2nd -> Now after selecting the MSM6275/MSM6280/MSM6290 option, select the option as shown below.


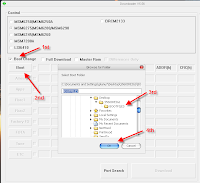
3rd -> Now that the BOOT LOADER files are in place lets proceed to FULL DOWNLOAD. Do EXACTLY as shown below.


4th -> Now with Rsrc1


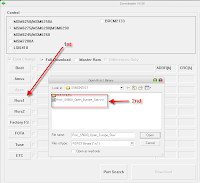
5th -> The next step is VERY IMPORTANT, choose Rsrc2 (LOW) & not (MID). MID is know to have problems while booting the phone.


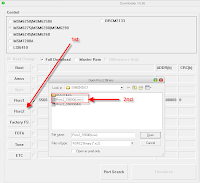
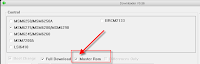
6th -> Now the Factory Setting files.


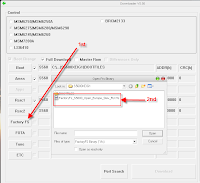
7th -> & finally the MASTER ROM.


8th -> At last the MULTILOADER should look like below, now click on the PORT SEARCH.


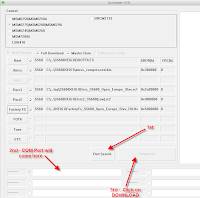
Once you have pressed PORT SEARCH, the COM PORT will come up in the filed shown, Click on DOWNLOAD.

Now sit back and wait, Multi loader will erase the rom and prepare it for rewrite in a matter of seconds. immediately after, it will begin the download process, this could take up to 20 minutes depending on you computers speed. After the process is complete, Your phone may restart on its own, this is ok. If your phones does not restart on its own, just remove the battery for a few minutes & reinstall your sim and memory card and you are ready to go! You may need to manually enter your wap and MMS settings but some providers sim will reset automatically.(I have provided with VODAFONE MUMBAI settings below)

Dark Forest's has recommend preforming a hard reset after a flash. This just makes sure every thing is cleared out and the firmware loads clean but this is not required.(In my case I had to do this)

You can perform a hard reset by typing *2767*3855# into the hand set (but not necessary.)
When the phone resets type *#1234# into your handset to check your new firmware version. :D

Thats it you are done.

Now with GPRS settings.Type as shown below.

Go to Menu -> Settings -> Network Settings -> Connections.
Create a new connection here with name Vodafone Live!
Acess Name -> portalnmms
Auth type -> Normal
User ID & password -> leave this blank.
Protocol -> HTTP
Home URL -> http://live.vodafone.in
Proxy Address -> 10.10.1.100:9401
Linger time -> 300
Don't touch the Advanced Settings option.

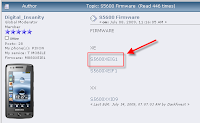
If you were looking for a method to update firmware on Samsung STAR (5233/S5230) visit Dark Forest's site here. The Firmware for 5233/s5230 can be found on his site here

To Install theme on this phone click here

PS: If you liked my blog & it has helped you in anyway kindly click on some of the sponsor links :)
Also if you are leaving a comment I would request you to kindly leave it with your email address, so that I can reply to you on your mail id as I hardly get time to logon to the blog & reply, or you can leave a comment/follow me on Twitter @gkanu7
Thanks.

Friday, June 26, 2009

How To Install Java Games/Applications on Samsung Star 3G


Hi, I have updated the blog with one more alternative method & some troubleshooting steps, so if the Method to Install TKEXPLORER doesn't work for you scroll down for the alternative method.
On how to update the FIRMWARE of SAMSUNG STAR scroll down till the end of the this blog.
Also Samsung CORBY users, this method should work for you & enable you to Install Java Games on SAMSUNG CORBY!!

Hello to all the Frustrated users of "THE ALL NEW SAMSUNG STAR & STAR 3G". The reason you are on this page is because you were looking for a way out on HOW TO INSTALL Java Games / Applications on this awesome phone.
I personally went thru a HELL trying to figure that out. I tried all the possible ways Google results had to offer.Finally emailed Samsung support who told me to call their helpline (which btw is pathetic) I asked the female there how do i install Java on my phone, she replied "IT CANNOT BE DONE" as the phone did not support 3rd party softwares. I replied but the phone has Google maps, which is 3rd party so how can it not support 3rd party software. To this she did not have any reply & gave me a ref. no. & told me that someone from the tech department will call, which i got only for the person to tell me that for this problem i have to call their service center in Santacruz (Mumbai,India).
So i called this number 66756952 & some guy named Mathew answers the phone. I told him my problem & he is like this cannot be done as the phone does not support 3rd party. If i wanted any other application/games i need to download it from Samsung's website which is paid. I said this doesn make sense, why am i suppose to pay when i get the stuff for free & wouldn't the stuff downloaded from Samsung's website be 3rd party? After a LOOONNNGGG argument with this dumb ass he finally said that he will try to figure out a way to install Java on this phone as he himself did not know how it was to be done.He noted down my number & said he will call me in 2 days time. But i was not satisfied with his assurance & being a IT person myself just couldn't give up. So i continued to figure out a way & luckily after 2 days of that phone call i did tumble upon a forum that had a solution for the same problem but for Samsung Eternity .
I tried it out & EUREKA it worked :) so finally the 3rd day I called the service center & spoke to Mathew & told him that he was suppose to call me, but he didn't. He said he was busy & din get time to do that, I said anyways I have found the way to INSTALL JAVA APPLICATIONS & GAMES ON STAR & Java Apps & Games are running absolutely fine on my phone. I said so just don't give the customers wrong info as 3rd party software don't work. They DO. He said he knows 3rd party software do work on such phone & he had a very good knowledge about it as HE HAD A iPHONE..(lolz)...
I just kept the phone down by saying,"No wonder you don't know anything about you own product."

Anyways that was my experience with the Samsung Customer Support. Now to get on with the cracking of Java in this phone :)

Before we start, I HAVE NOT INVENTED THIS METHOD,NOR DO I TAKE CREDIT FOR IT. I JUST TRIED OUT A METHOD MEANT FOR SOME OTHER PHONE & IT WORKED OUT FINE FOR ME,IF IN THE PROCESS YOU SCREW UP YOUR PHONE IT'S NOT MY RESPONSIBILITY.

Ok, lets start. We will require 3 things
  • TKFileExplorer
  • Jar creator (optional, required only if your Java file ".jar" does not have a .jad file.Download here)
  • Java App/Game you want to install. :)
Step 1 -> Download and install TKFileExplorer from here Also if you haven't installed PC STUDIO or the USB driver, now will be a good time to do that.

Step 2 -> Open TKFileExplorer and go to Settings then choose COM. On Port,
click the drop down menu and choose the only port that is visible (something like port 5/port 6). In my case it was port 8. (IF COM PORT IS NOT PRESENT, TYPE IN MANUALLY.START FROM COM1,COM2.. so on)

NOTE* You must NOT be connected in PC Studio program.


Now click on FILE and CONNECT or in the icon as shown below.


Step 3 -> On the bottom Left of TKFileExplorer, browse through these folders Exe -> Java -> Games.
Now that you are in Games, Create a folder on your machine with the name of the game & paste the .jar & .jad file in that folder.Now go back to TKFileExplorer & browse for that location where you have made the folder right click & Select Download.


Thats it you done for the TKFileExplorer part. Discconect your phone by clicking the icon or by File -> Disconnect.

Now open up your dial pad and enter the following, *#6984125*#.
Choose INTERNALS and enter the following, *#9072641*#.
Now scroll down and choose Storage Settings. Then Update Java DB, followed by update Apps database.
Now you are finished. Go to Menu - Applications -> Games & More. Your newly installed App should be visible!!! :)

Now That you have fixed your JAVA issue, lets jazz up the phone a little bit. Below are some wallpapers i created for my phone.You guys can download it if you like them.
I have made the wallpapers along with the menu image for it.There are some more which i'll upload shortly.


-----------------------------------------UPDATE-----------------------------------------------

Well many users told me that they were not able to see COM ports or TkExplorer crashed while they were using it, so if you are one of them this part is for you.

1st -> Reboot your phone.

2nd -> Uninstall pc studio & delete the .ini file created by TkExplorer,reboot your system & do a fresh install after reboot.

3rd -> Go to Menu ->Settings-> Phone Settings-> PC Connections & select ASK ON CONNECTION -> Save. Now when you connect you will be asked for which type of connection.Choose PC studio & MAKE SURE PC STUDIO APPLICATION IS NOT RUNNING.

4th -> Also I hope you guys are not trying to select multiple files/folder? Just make a folder of one game (should contain its .jar & .jad file) & download that file in the phone in the location I have mentioned ONE AT A TIME FOLDER BY FOLDER.

5th -> Also (I might be stupid to ask this :P ) But does your phone have enough free space, I mean not the addon memory card, the INTERNAL MEMORY.

6th -> Make sure your bluetooth is off or any other application for that matter

7th -> Download this USB modem driver (as last option, for people who still cant get the COM port)

http://www.samsung.com/us/support/download/supportDown.do?model_nm=SCH-I760&mType=SW&vType=L


------------------------------------ALTERNATE METHOD------------------------------------
If the above method didn't work for you then this is the alternate one I found on a forum, but you need to have GPRS activated in your phone for this to work.

Download via WAP LITE FTP
Go to m.getjar.com look for an option called Quick Download (at the end of the page). Enter 51799 as the code (thats the code for LITE FTP) -> Download.

Once downloaded connect your phone to PC using your USB cable. Now you can either choose PC studio option or you can choose Mass Storage option. Now once you have decided what option all you need to do is make a folder in your memory card of the games name & paste the .jar & .jad file of the game in memory card.

Now disconnect your phone & start LITE FTP . which should be installed in Menu->Application->Games & more ->Lite Ftp

Once LITE FTP is started go to your memory card & copy that game folder you just created & paste it in the 1st folder which is named "My Private My Photos My games......"

Now open up your dial pad and enter the following, *#6984125*#.
Choose INTERNALS and enter the following, *#9072641*#.
Now scroll down and choose Storage Settings. Then Update Java DB, followed by update Apps database.Update media database.Create AX Dat File

Now you are finished. Go to Menu - Applications -> Games & More. Your newly installed App should be visible!!! :)


To download Touch Screen Games click here
To Update the FIRMWARE of SAMSUNG STAR click here
To Install theme on this phone click here

PS: If you liked my blog & it has helped you in anyway kindly click on some of the sponser links :)
Also if you are leaving a comment i would request you to kindly leave it with your email address, so that I can reply to you on your mail id as I hardly get time to logon to the blog & reply, or you can leave a comment/follow me on Twitter @gkanu7
Thanks.

Monday, April 13, 2009

How To Install VMWARE Server in UBUNTU (Hardy) ?

VMWARE Server, well for those who know what VMWARE is skip this paragraph & for those who don't read on :)

VMWARE Server allows user to create & run other OPERATING SYSTEMS (Virtual Machines or commonly know as VMs) on the HOST machine running VMWARE Server.OS like Linux,Windows, Free BSD,Solaris etc can be run on this.The benefit of this is that you can try out new OS without screwing up your existing set up & also have other OS running without having to buy a whole new machine for other OS or making a dual boot system.

Now to start with the installation. Go to http://www.vmware.com/download/server/ & download VMWARE 1.0.x (I havent tried this on 2.0 so have no idea if this will work for it) Select the version you want & then you will be redirected to a License Agreement page, scrool down & press YES (like there is any other option :P )


Once done with that a pop up window will come up asking whether to save the file or open it, select save.


Once you are done with the form, submit it.The next page will have the serial number.Write it down somewhere or save it. Now go to Terminal.

Applications-> Accessories ->Terminal.

Or just press
Alt+F2 & in the Run Application window just type gnome-terminal


Once the Terminal is up, type the following command to get some necessary packages.

sudo apt-get install linux-headers-`uname -r` build-essential xinetd


Next go to the location where you had saved the VMWARE tar.gz file (by default firefox will save it on your desktop) so for me the path would be


cd /home/kartik/Desktop/

(replace kartik with your name/your session name)
Unpack the VMWARE tar.gz file & then run the installer.To do that run the following command.

tar xvfz VMware-server-*.tar.gz

(where * means the file version you downloaded. I downloaded 1.0.6, so for me the command would be -> tar xvfz VMware-server-1.0.6-91891.tar.gz )


cd vmware-server-distrib sudo ./vmware-install.pl

After executing the above commands the installer will ask you a lot of questions, just keep on pressing Enter & keep accepting the default value.

If the installer gives out an error on this question:

Before running VMware Server for the first time, you need to configure it by
invoking the following command: "/usr/bin/vmware-config.pl". Do you want this
program to invoke the command for you now? [yes]


Then you need to download a patch for it.
Type the following in Terminal.

cd /home/kartik/Desktop wget -c http://www.insecure.ws/warehouse/vmware-update-2.6.27-5.5.7-2.tar.gz


Once the download is complete, type this

tar xvfz vmware-update*.tar.gz cd vmware-update*/ sudo ./runme.pl

This will patch the VMWARE installation & you can continue from here.
After this you can accept all the default values & proceed.Also when asked for default location to store your VMs

In which directory do you want to keep your virtual machine files? [/var/lib/vmware/Virtual Machines]

you can either select this default value or type another path where you have space (like another partion or disk)

Finally type in the serial key that you had got after registering with VMWARE.
Thats it!! you have sucessfully installed & configured VMWARE Server :)

To start either go to Applications -> System Tools -> VMWARE Server Console
or just type in Run Application vmware.


Thursday, February 19, 2009

How To Install ULTAMATIX On HARDY?

Probably the MOST HATED application in Ubuntu will be ULTAMATIX.Simply for the reason that Linux Guru's say that installing apps thru ULTAMATIX break your configuration in Ubuntu & or it doesn install apps properly.
There are hardly any forums that tell you how to install ULTAMATIX & even few which tell you where to find it.
Personally I feel its one of the best Package ever made , just for the simple reason that when a noob like me is shifting from Windows to Linux it makes our life easier.(Windows user have very little patience :) ) They cannot sit in front of the machine looking at a DOS like window (Terminal ;) ) & keep typing the commands (i.e if they know any in the 1st place :P ) They need something that will allow them to just click & double click & install their applications.

Now I am no Linux Guru, but i have been using ultamatix for quite sometime now & i haven't come across any trouble.Actually it was due to Ultamatix i was able to get thru the initial stage of my Linux learning days where I did not know any commands of the terminal & or how to install any app in Ubuntu.

Now to start with how to install Ultamatix.Well you need to go on this link & download the .deb package of Ultamatix. also while you are on that page just go thru the list of 101 apps / games Ultamatix has to offer :)


Once Ultamatix has been downloaded on to your system, double click on the .deb package icon & start the install.


Once the installation is complete, click on close.


Fire up ULTAMATIX!!!


On the left hand side there is a menu of application list. when you click it on the right hand side it opens up the list of application belonging to that section.
Choose (check mark) the application you want to install & then on the top START, thats it you are done.
Ultamatix will get all the packages, compile them & install them for you :)

Sunday, February 15, 2009

How to install OpenSSH Server in HARDY with Port Forwarding in your Linksys Router

Before we start I have to tell you,really bored to write this, but my dear Dadu keeps telling me that i should keep updating the blog.So here it is.


To Enable SSH all we need to do is install OpenSSH. To install OpenSSH follow the steps mentioned. Open the Terminal either by going in Application->Accessories->Terminal or by doing ALT+F2 and typing "gnome-terminal" (without the quotes) in the RUN enter. Once the terminal pops up, copy paste or type the following command in the Terminal.

sudo apt-get update

after the update type this

sudo apt-get install openssh-server

Once Openssh is installed, we need to configure it.(This can be optional, but I would suggest to do it so as to increase the security of your system)
For this we need to open up the sshd_config file.
Type the following command in Terminal(or copy paste) :)


sudo gedit /etc/ssh/sshd_config

(You can use any editor of your choice vi emacs or whatever, I have used gedit)
once the file opens up search for the following
line.

PermitRootLogin

set it to NO, which should look like this.

PermitRootLogin no


Also If you want you can change the default port from 22 to something you like, as this would boost up your security for default ssh atta
cks on port 22. To do this search for the line called Port. Change the value there from default 22 to something you like.
After this is done, save the file and close it.Now we need to restart the ssh service.To do that we need to type in the following command in the Terminal.


sudo /etc/init.d/ssh restart


Thats it you have successfully installed OpenSSH on your machine.


Now if you are behind a router or a firewall you will need to enable the port forwarding.
I have a linksys wifi router, hence I'll be taking that as as an example. If you have any other you can visit portforward.com & see how to enable Port Forwarding in your router. Type in your routers IP address in the browser to open up the browser console page.


which in turn will open up the below.


One the above page opens up, click on Advanced settings which will open up the user id password setup.Type in your user id & password.


Once on the linksys console page do as shown below.


In the Application feild type anything you like(thats just for your reference). Type the port number you have kept for OpenSSH in the Start & End field, type the IP of your computer & check mark Enable. Once this is done, click on Save Settings to save the settings. Thats it You have now configured your linksys router for Port Forwarding for OpenSSH.